
Introduction
In this module you are asked to design and then build a short (60 second) Visual Effects sequence for one of the following:
- A TV commercial
- A video game cutscene, opening, intro or other action sequence.
- The opening or ending of a Film or TV Show
- A particular sequence in a Film or TV Show
- A Music Video
- Or other sequence agreed with the Module Co-ordinator
Part 1 – Portfolio Piece
For the first assignment, using the WordPress Portfolio you will need to create a section in your blog called “Visual Effects”.
Here you will provide information related to your creative design process towards your production piece for this module. You can include a range of information to support your design process, you should aim for a total of at least 1,500 words, supported by imagery.
The content should cover at least the following items:
- Description of the intended piece in relation to a particular genre or tradition (is it a TV commercial; is it a video game cutscene, intro or other sequence; the opening or ending of a Film or TV Show; a particular sequence in a Film or TV show; Music video etc.?)
- Storyboard of the final piece, following professional conventions
- Exercises on particular effects or an animatic of the whole piece
- A narrative of how your piece will explore some of the techniques and tools employed in Visual Effects such as those practiced in the laboratory and sessions
- Production notes (ie. Camera mapping, assets to be employed or designed, etc).
- Reference to all employed Creative Common assets following the UoH academic guidelines.
Part 2 – Production Piece (3D Rendered Output) – 60 Seconds
For the production piece you will need to produce your designed Visual Effects sequence and then provide:
- A YouTube link/embedded video (min 1080p, recommended 2K or 4K resolutions) of your final production piece. (You may additionally provide the video file in case the YouTube link doesn’t work)
The production piece should clearly demonstrate your knowledge of Visual Effects and its application within the context of the product you are creating. A range of Visual Effects techniques covered within the module should be embedded within the sequence that you build.
The duration of the piece will be at least 60 seconds, excluding any list of references provided (that list can also be provided through the portfolio so there is no need to do it as part of the video).
Research

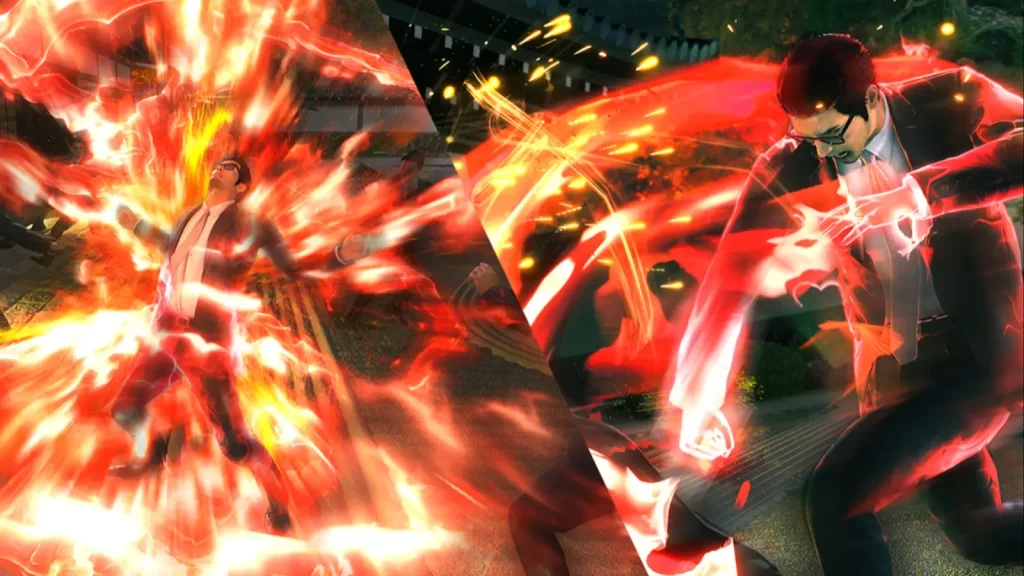
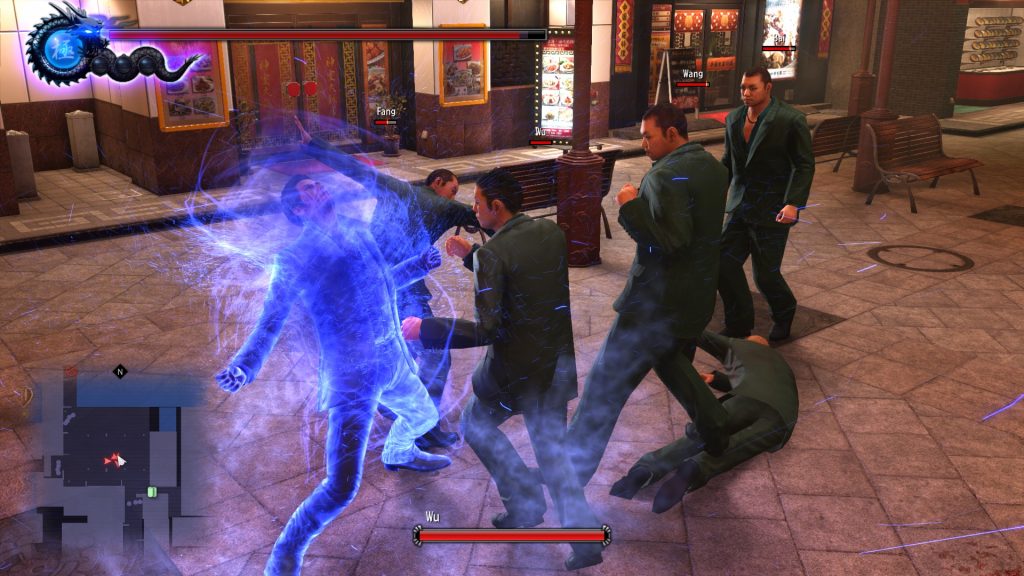
Games will have all kinds of different Camera shots to express their scenes and Effects to add more emotion, create tension, suspension or make the Character feel Powerful.
A good example for Cinematic Shots and Visual Effects is the Yakuza Series From Ryu Ga Gotoku Studio and SEGA. They make use of creating stunning Cinematic Shots from Far to Up-close Shots. The Effects are quite Impactful when you fight hordes of Yakuza, Mafia, Bikers, Delinquents, etc. So many variations in Colour and Textures
I want to use their games Cinematic Shots and Effects as a good reference for when I begin the development of the Effects for the Cutscene.
The Yakuza Series is a great Series which can be found Here : https://store.steampowered.com/sale/franchise_yakuza
There is One Unreal Engine 4 and 5 Youtuber who makes some outstanding Visual Effects and Tuotirals, that is Alex Huang. His Channel can be found Below:
https://www.youtube.com/@A1exHuang/featured
I will using Alex Huang’s Work as a great reference and use some of His Videos to help make some great Effects.
Storyboard
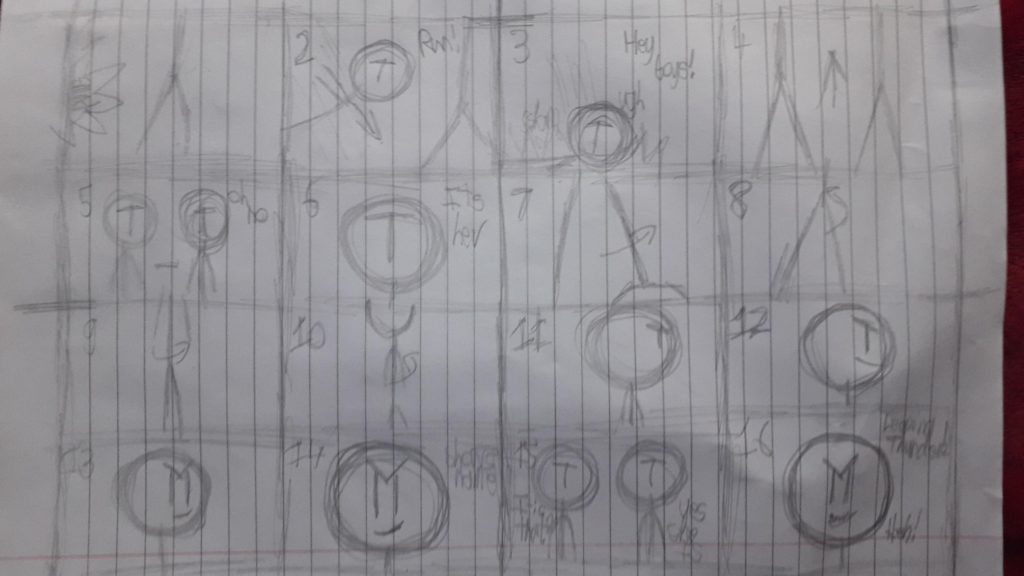
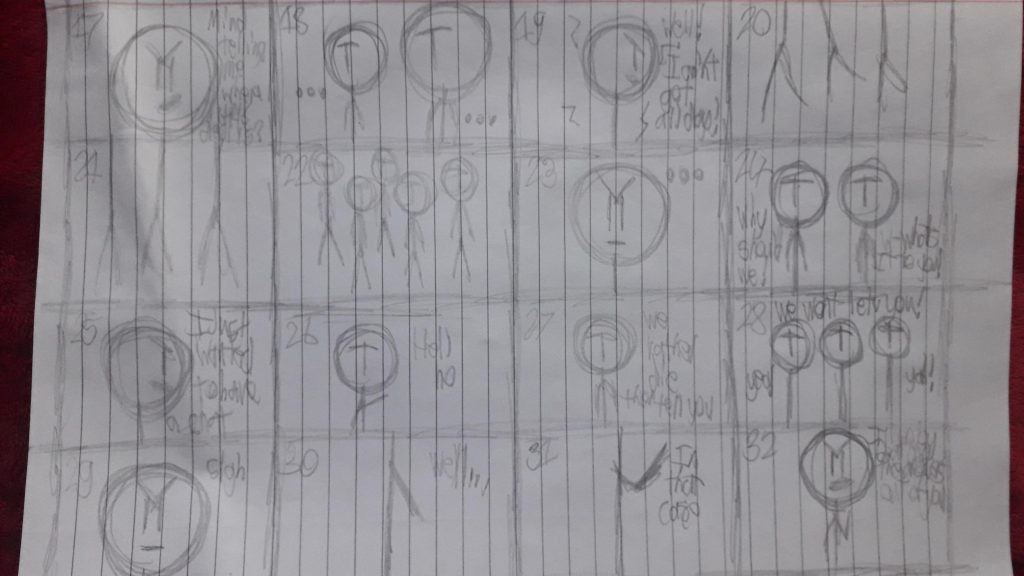
For the first task, I needed to draw a Frame by Frame Storyboard, Explaining what will be happening in the Game Cutscene. With 32 Frames, I tried to show what would happen in the Cutscene with the help of Dialogue, Camera Shots and Pacing.
The Game Cutscene goes in the Following:
- Guy runs into Scene and Falls over from being attacked
- Two Members run to the scene and become shocked to see who the attacker is
- Main Character Appearance is revealed and shows the Name of the MC
- MC begins to ask the Enemies where their Boss is to locate the Deal
- Enemies refuse to tell her and more Enemies show up ready to fight her
- MC then says her final Dialogues then Gets ready to beat the information out of them
- End
VFX List
- Electric
- Electric Aura
- Electric Stun Effect
- Magic Orbs (Around Model)
- Impact/Puff/Smoke Effect
- Electric Dissipate Effect
Unreal Engine 5
Niagara Effects – Experimentation
In the Module for a Week, we were tasked with Experimenting making VFX in Unreal Engine 5. This helped with understanding the software on how to make functional Niagara Blueprints and how to Use Textures we wont to implement into the Blueprints.

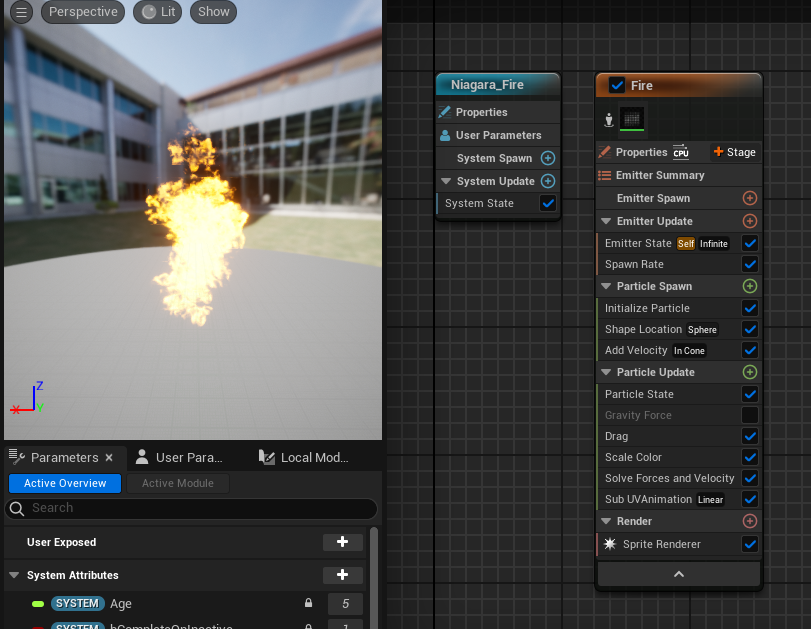
Through Experimentation, I had made a Fire with Smoke Niagara Blueprint. This was made with Two Texture Entities, both with Niagara Effect Textures that comes with Unreal Engine 5. The Spawn rate for the Fire and Smoke was increased to make a bigger flame and intern, more smoke will be produced.
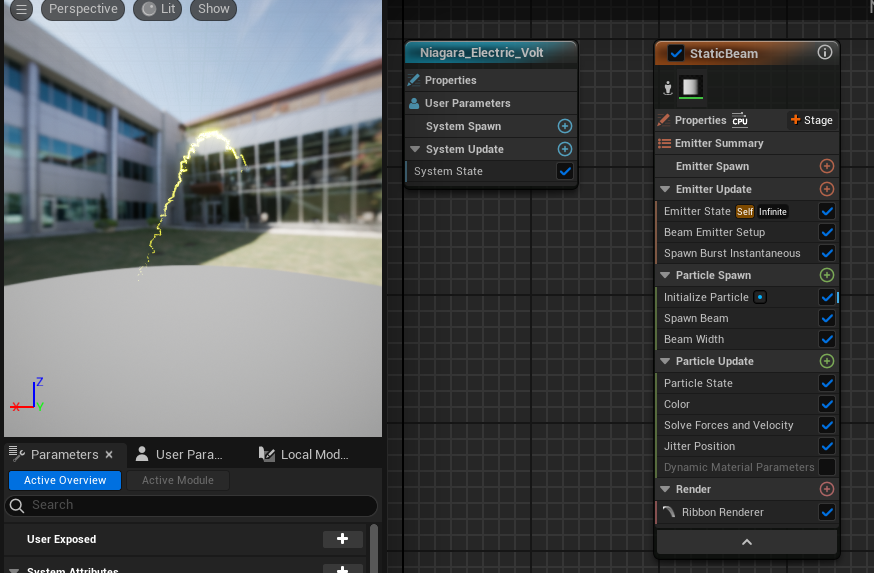
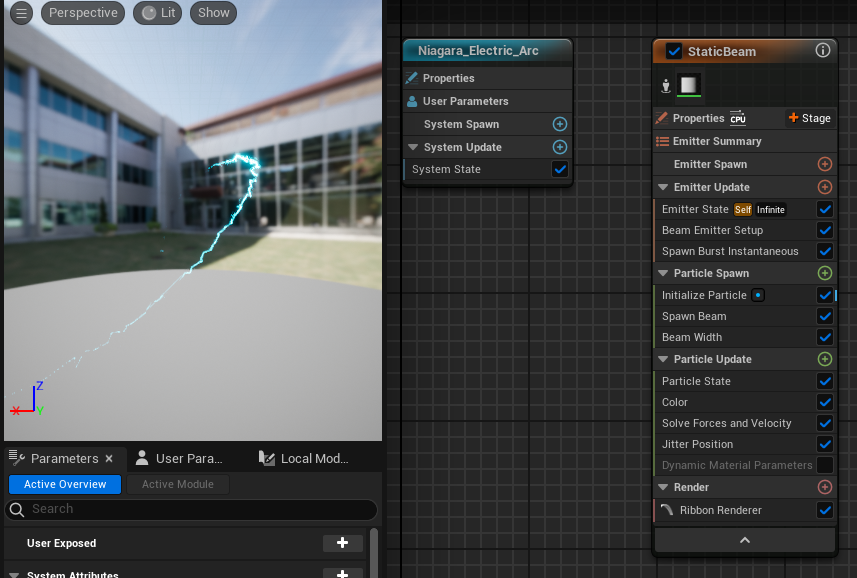
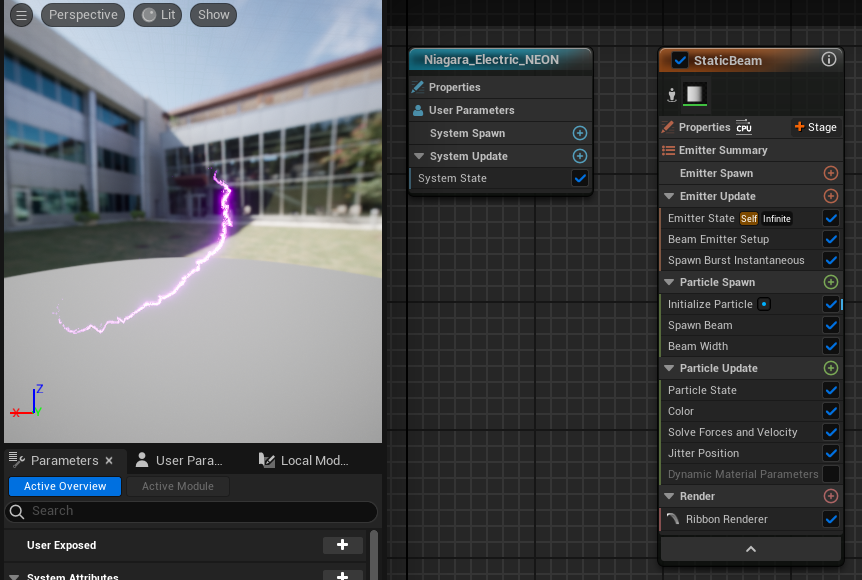
I was messing around in Unreal Engine 5, making different Electric/Lightning type effects that I could use for my Cutscene. So I made this cool Bending Electric effect, in three Different Colours. Yellow, Teal and Purple.
Sadly I did not record the Progress made for this Experiment, I also cant apply a Reference because I couldn’t find the Video I used to help with making the Blueprints for the effects.
Other Experiment Effects
Niagara Effects – Electric Texture
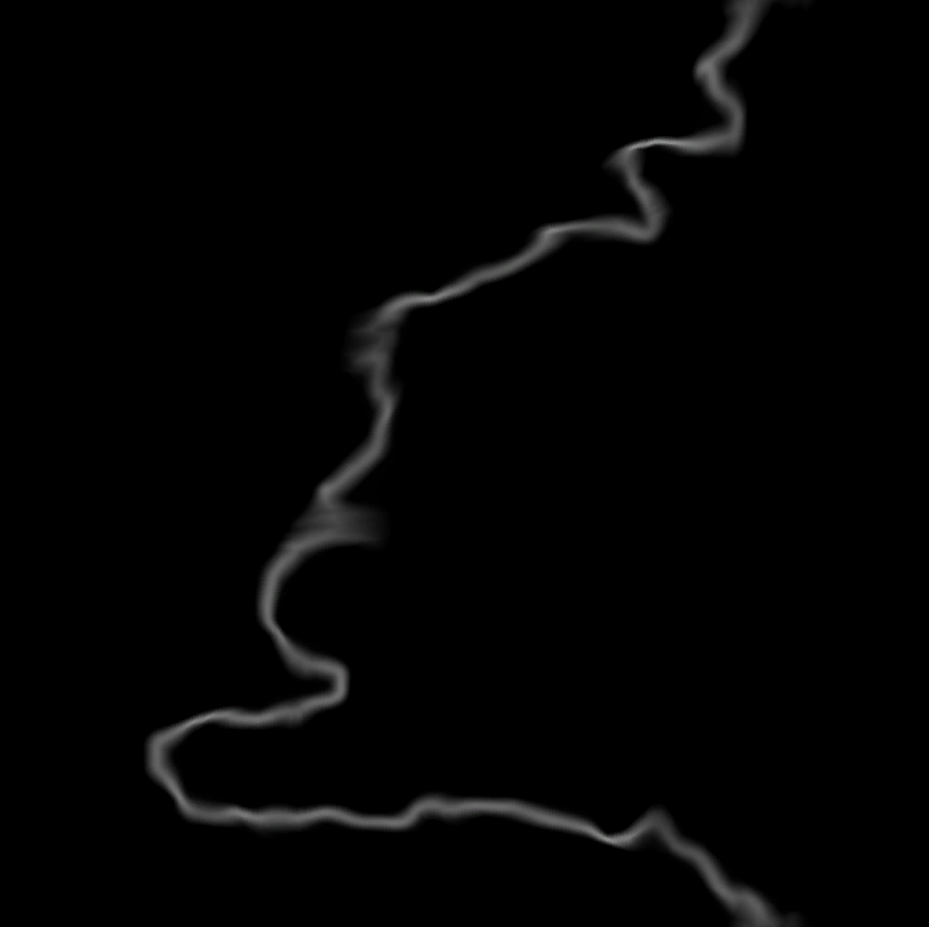
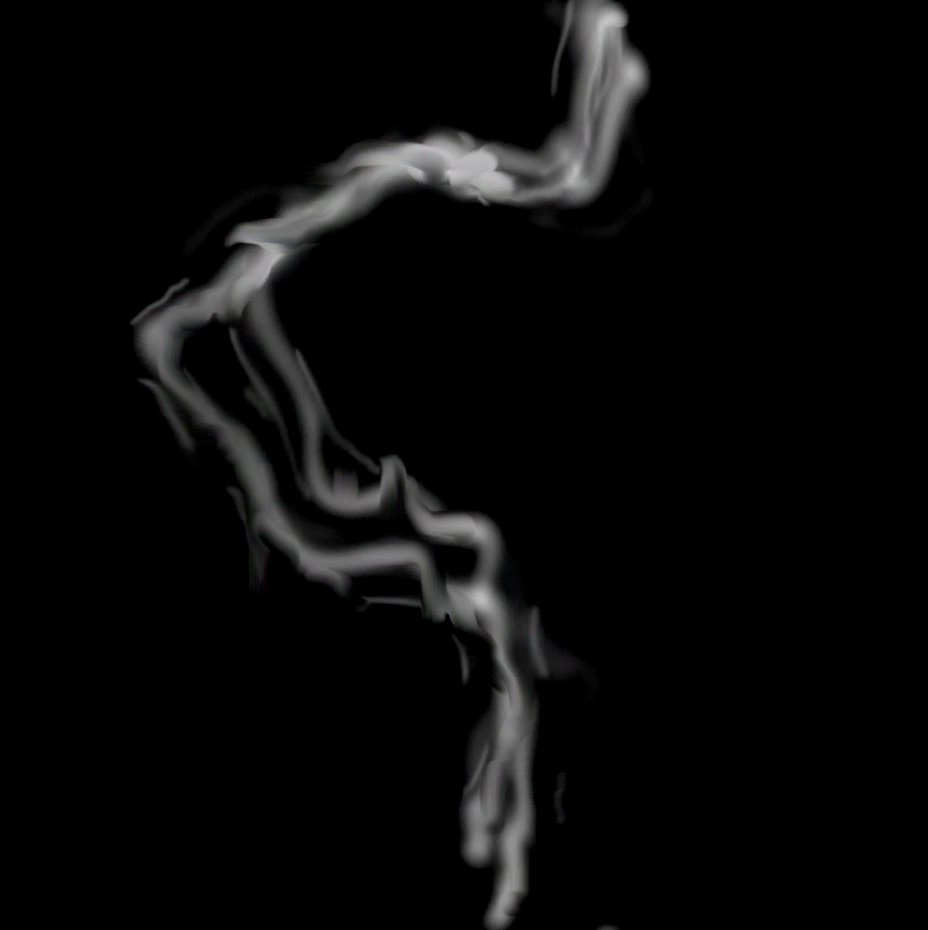
My friend on Discord allowed me to have access to two Electric Pattern Pictures that he was given to on Microsoft Teams. With these I am able to send this into Unreal Engine 5 to use for my VFX Blueprints.
I will be able to make multiple combinations of Electricity effects and colours. For Example: An Aura with the Larger Electricity that’s Yellow and add in the Smaller Electricity that will be Blue. Using only the Small Electricity I can make a Paralyze Effect to place on the Enemy Models for a better Stun Effect.
Material Blueprint
To make the Materials Better, I will need to create Blueprints to add Glow, 3D Effect and Having its own Animated Movement. This will the Material stand out more when Applied to my Cutscene. The Video that helped me make this Animated Effect for my Materials is linked Below (Helped in the future to create my Lightning Aura for the main Character):
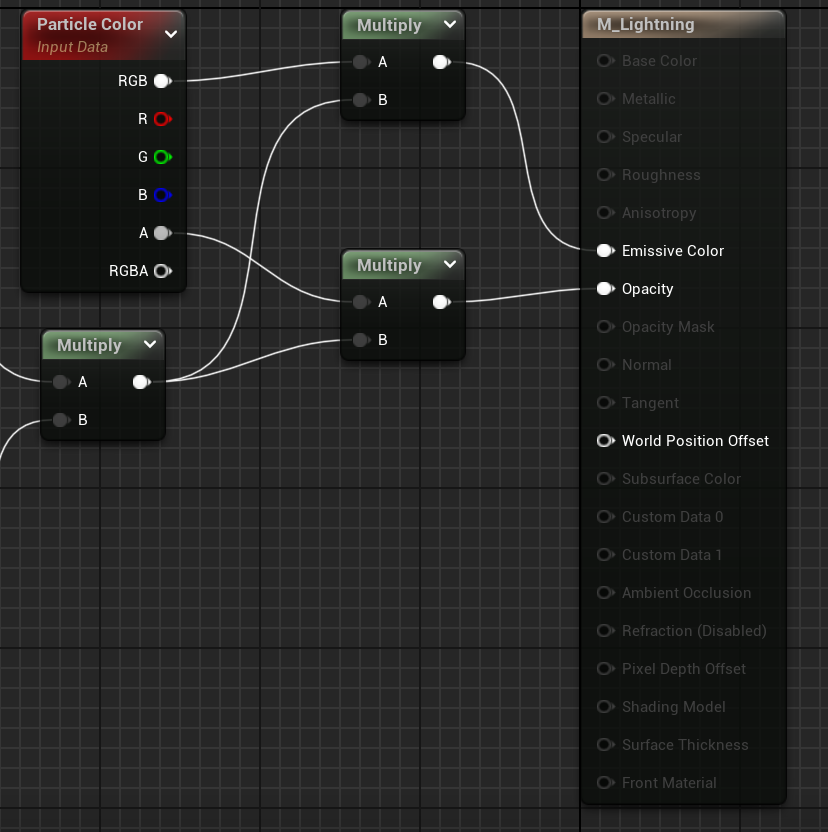
Now with a Blank Blueprint, I started with a Particle Colour Input Data Tab. This will allow me to change the Electric Colour with needing to make Tons of Duplicates with Different Colours. In order to allow me to select the Colours I want, I need to create to Multiply Tabs.
Which one will lead from Emissive Colour to RGB. The Other one will Connect from Opacity to Multiply. A will go into the Alpha Channel and B will go into the Second Multiply.
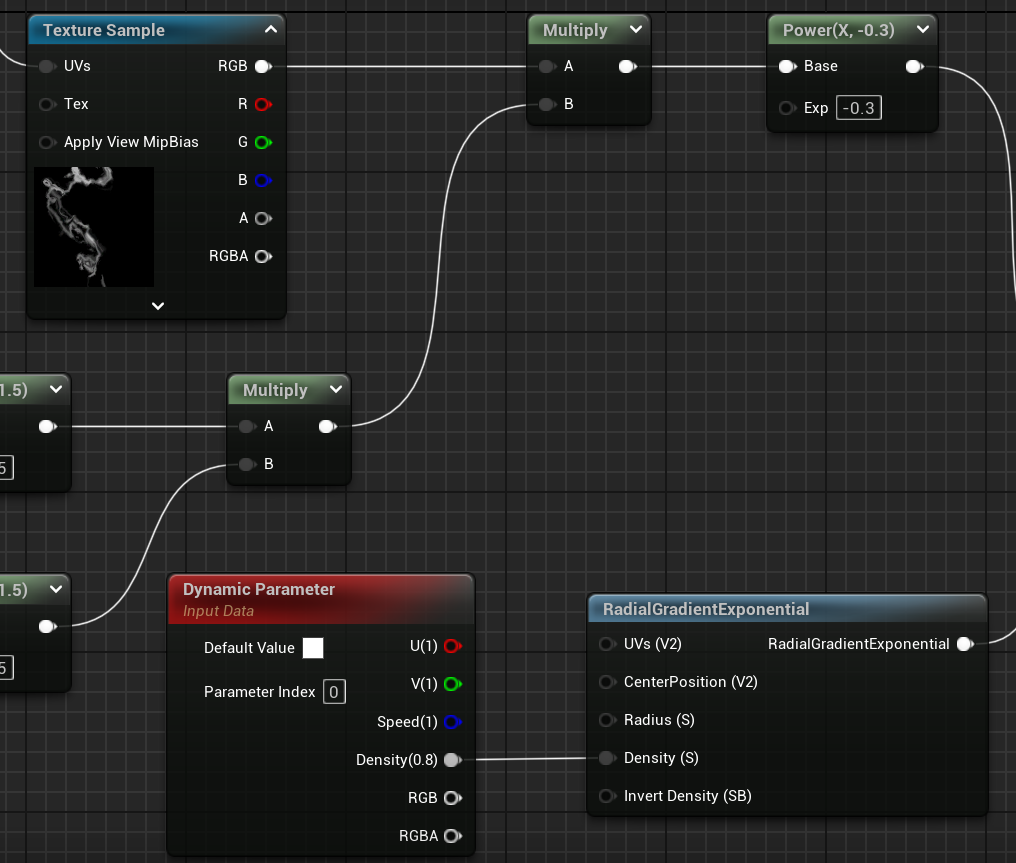
A will lead to a Power tab, into a Multiply and Finally into the Texture Sample. I Place the Line V2 Material into the Tab and now I have my First Custom Material to place into Unreal Engine 5. But there is still adjustments needed to make the Material Move on its own.
B Channel will go into a RadialGradientExponential. This will allow the Engine to recognise certain Structure Details of the Material and I can alter each according to what I pick. Density went into Density and set to (0.8).
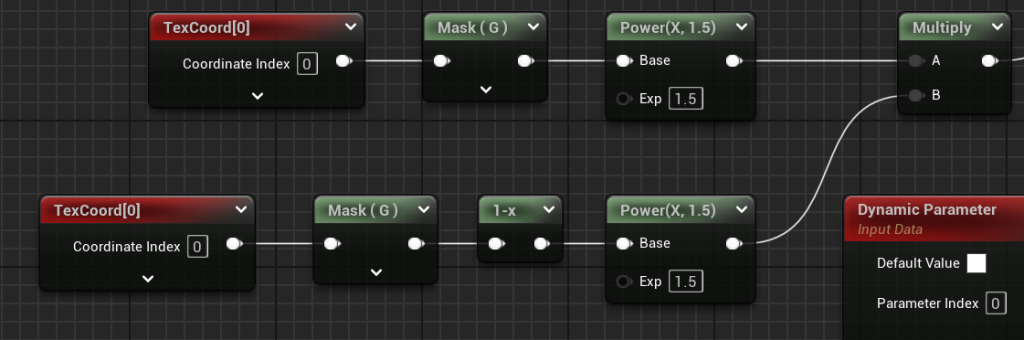
Now I need the Software to only show the White Area of the texture, So I need the Software to Remove the Black areas like a Greenscreen Effect. So two Power and Mask tabs were created in order to make the Black background, Transparent. One Mask for the Upper part of the texture, whilst the other is for the lower part.
Now the White Lines are the only thing you can see. now I will need to make the Lines Move like Electric.
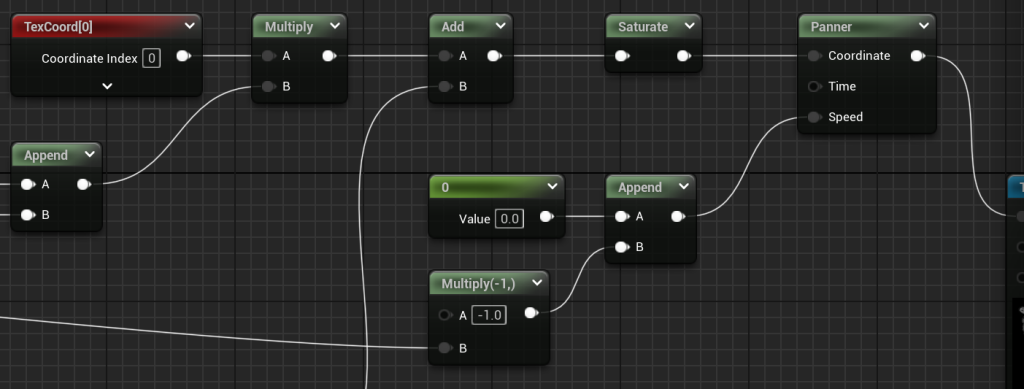
This section will help create a ‘Distortion Effect’ to the texture to make it wavy but by itself wont make the texture move. So, it will need help from Coordinate Tabs and further down the line, Texture Sample with a Dynamic parameter.
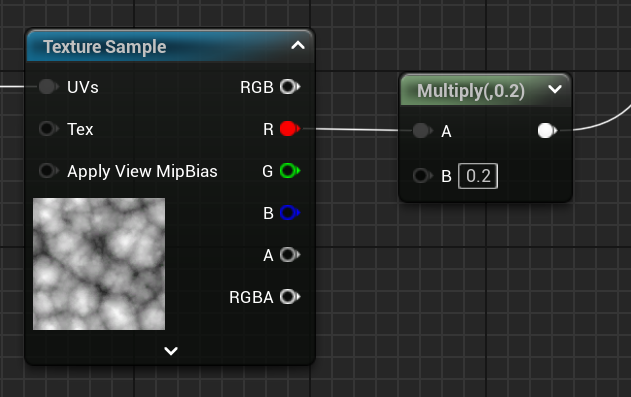
Now from the Add Tab, I created a Multiply with (0.2). A Channel connected to the Red Channel of the Texture Sample. This Further Increase Distortion by Increasing the effect level to match the Texture Sample. Now I need this Texture Sample to move.
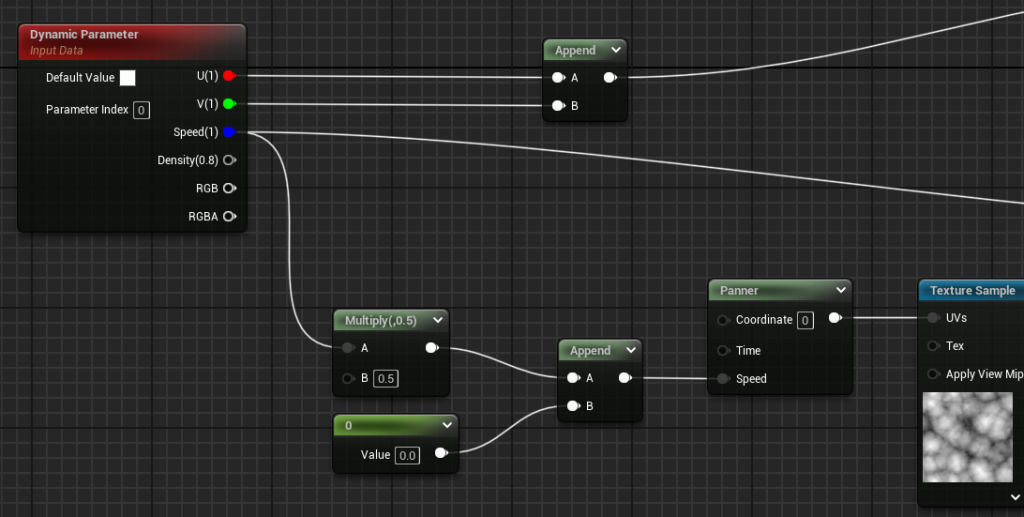
Through the UVs Channel connect to a Panner, Speed Channel to Append, To a Multiply then A Channel into the Speed Channel of the Dynamic Parameter. The Upper Append Tab from Earlier, A Channel connect to the U (Red) Channel and B Channel to the V (Green) Channel.
Now the Two Sections of tabs are now Affected by the Speed Channel from the Dynamic Parameter. Now the Texture Sample and Effects will now Move, giving a Wavy and Zapping Electric Effect to the Texture.
Now It is ready to be used to create my Effects for the Cutscene and there will a good few Electric Effects used for this Project.
Niagara Effects – Lightning Aura X
Using the same YouTube Video to make my Animated texture Blueprint, to go step by step to create a Electric Niagara Effect and Create a way to make the Effects to ‘Wrap’ around the Body, So its just not a giant circle around the Character. This Aura is like a full power like Effect for the Character.
Once fully done, I made my own alterations to the Colour which I made Yellow (R: 30.0, G: 20.0, B: 1.0, A: 100.0). I changed the Spawn Rate to 50, Increased X Value of the texture to 20.0 and Y Value to 30. Then, I duplicated and changed the Electric colour from Yellow to Blue (R: 0.0, G: 5.0, B: 15.0, A: 100.0)
Now I have Yellow and Blue Electric Texture Effects for my Aura.
I made the Spawn rate much less from 50 to 10, X Value from 20 to 10 and Y Value from 30 to 20.
Now I wanted to add more spice to the Aura, I wanted Magic Orbs to fly around or away from the Character. I duplicated the Electric Effect, changed it to a Sphere Mesh, added more Glow and Kept the Colours from the Electric Effects. The Spawn rate is decreased to 5 but the Lifetime is longer from (0.2 – 0.4) to (0.6 – 1.0).
Now this Full-Power like Aura looks big and intimidating and make you feel like you should run away. The Effects also trail Behind when the Character Moves, which looks beautiful and Magical.
Niagara Effects – Lightning Aura X Small
Now I want to make a simple small Aura for the Main Character, this will be the Aura that the Main Character will start with in the Cutscene, but then will get the Full-power like Aura at the end of the Cutscene.
There is a simple way of making the smaller Aura. All I did to make this was I duplicated my Aura_X Blueprint and the first thing I did was Disable the other three Tabs, so the Yellow Electric was the only Active Tab shown.
The Electric Effect Spawn rate was Decreased from 50 to 2 but Size and Colour did not change since i didn’t see that much point. this would make the Electric Texture harder to see if the size went lower with a lower Spawn rate, So I kept it the same.
Niagara Effects – Electric Stun
Now I needed to have some sort of Stun Aura Effect added for the Enemies to show they Have been hit and Intern have been affected by the Main Character’s Electricity Magic.
I Duplicated Lightning Aura X Small Blueprint, Yellow Electric Effect was still active and Blue Magic Orb Effect Tab was reenabled. But the Blue Electricity and Yellow Magic Orbs Effects were Removed.
Yellow Electric Effect’s Spawn rate, Colour, Size and Lifetime Did not change.
Blue Magic Orb’s Colour and Lifetime did not change but the Spawn rate went from 5 to 1. Since the Stun Aura Effect will also Affect the Enemies Magic, so the Blue Magic orbs were added back in for that extra Detail.
Niagara Effects – Electric Burst
Now with the last of the Electric Effects, Electric Burst. I wanted to create an Effect where the Main Character would Punch Something or Someone and at the impact zone, a mini explosion of sudden electricity. This one was NOT made step by step via Video, Pure knowledge.
Using the Default Omnidirectional Burst Blueprint, I changed the material to the Electric Effect Material, Now its shoots out electricity.
Now the problem was that the Electric Particles has quite a bit of Gravity. Our Atmosphere’s Gravity doesn’t really do much to Electricity since Electric has its own force of Gravity.
So Electricity just floats in any direction and that’s the result I want out of the Niagara Effect Blueprint. So Under ‘Gravity Force’, I changed the Gravity Z Value from 100.0 to 1.0.
Now the Electric Effect will just ‘Float’ in the air, now i got the Electric Burst I want.
Cameras and Master Sequence
In order to make a cutscene, I will need a Master Sequence to Add Cameras, VFX, FX and Animations. However, it was really simple to make a Master Sequence. Click the Cinematic Icon, on the top-left of the software. Usually there would be a ‘Create a Master Sequence’ but since I already made one, that is no longer a option.
But, you can use ‘Add Level Sequence with Shots’. Either way will get you the same results needed to get stated with making a Cutscene.
I learned all about using The master Sequence and how to place objects onto the Sequence through the video below:
…
Now with better understanding of the Master/Cinematic Sequence and its Shortcuts, I can now begin with the Event and Placement Process of the Cutscene.
Starting with the first few shots from my Storyboard. The camera shot will start to move right into the bigger area of the alleyway and then come to a stop.
The Enemy will come into shot but will instantly fall down from being attacked by the Main Character.
After the Enemy has fully fallen down into shot and stops moving, He not dead just Stunned. The Main Character will then walk into the shot, Showing only the Legs of the Character to hide the identity of the main Character.
The next shot will be on the other side of the alleyway and the Camera will not move. Two more Enemies will run through the Camera shot, left to right at a fast pace.
The Camera shot will take place about near the center of the Big alleyway Area, facing towards the area the Enemies will show up from the previous shot.
The Two will run from the corner on the right, into the center of the Camera Shot. They will stop in place and become shocked to the Identity of the attacker, becoming more afraid.
The will then return back to the Main Character but the shot will show only the feet. The shot will make a spiral motion around the Main Character, who will stay in place.
Slowly going up the Body until the shot reaches the Head. Then the shot will zoom in on the face revealing the identity of the Main Character, Aureline Musashi, aka Leaping Thunder.
The Camera Shot will switch between side views of the Main Character and the Enemies, creating a Tense Atmosphere. After a few moments more Enemies will show up onto the Scene.
The Camera shot will follow the Three new Enemies down the Alleyway, towards the scene. They will meet up with the Two Enemies, forming a group to attempt intimidation towards the Main Character.
The Camera will switch between the Enemies and the main Character, dependent on who is moving/talking at the time.
The Main Character will ask about where their boss is but the Enemies refuse to tell her where he is or any information for that matter.
They continue to threaten Aureline and stand their ground, if its necessary. Whilst the Enemies are Talking, Aureline Continues to listen in Silence.
Once the Enemies have finishes their last sentence, they get into their fighting poses and are ready to fight Aureline, to ‘Protect their Boss’.
But Suddenly, Another Enemy comes out of nowhere and decided to jump and wall run towards Aureline. The Camera will start to follow the Enemy once he shows up at the back of the Group.
Then when the Enemy jumps off the Wall, he activates his Fire Magic and goes in for a Fire Punch. The Camera acts like Aureline’s Point of View.
The Enemy gets closer and aims towards the Camera with his Fire punch.
The Camera will suddenly move behind Aureline, to show she countered the Fire Magic user with Her Kick, infused with Electric Magic.
The Enemy gets blown away by the sudden impact to the stomach and flies over the Group of Enemies. The Enemy lands with a Massive Thud, Paralyzed and unable to move from the damage.
One of the Enemies looks back and falls into shock from what just happened to one of their members. Then they look back towards Aureline in fear about what gonna happen next. (Menacing…)

The Camera will be placed behind the Enemy, looking towards Aureline just standing there, menacingly. The Camera will zoom in towards Aureline’s Face and stay there for a Few Seconds.
Then the shot will move down to her hand, making that the main focus of the Shot. her hand will start to raise up and the Camera will follow, keeping her hand in the Center of the Shot.
Whilst the hand is raising, Aureline amplifies Her Magic, making Her Aura more intense and bigger then Previously.
The Camera will move behind the Enemies, creating a wide shot of the Alleyway that they are in. The Camera will make a Slow Zoom-In shot towards Aureline.
Then It will suddenly Zoom in quickly to Aureline’s Face. She will then say her final words to them. The words she will say will be on the lines of ”Get Ready”, or ”Guess Ill have to beat the Information out of you then!”.
The Cutscene will then Fade Out to Black and that will end the Cutscene.
All Created Assets
Final Product
What I have Learned
- How to create a Master/Cinematic Sequence, How to assign Objects and Meshes to the Sequence Track
- How to control the Cinematic Camera, change Field of View, Focus, Tracking and using the correct shots for maximum efficiency
- Learn how to make my own Niagara Blueprint Effects and how to efficiency use them on the Master/Cinematic Sequence
- How to Properly Capture, 3D Render the Master/Cinematic Track and Upload it to YouTube
Changes I would Make
The only change I can think of from the top of my head, is having the Cutscene be a bit more Action packed. This way I could’ve more of an Impression for the viewers, showing off more Animation and Engaging and making more Effects like Magic or Impact Clashing Effects.
Conclusion
The Entire process of learning how to make a Cinematic and Making my own Effects, Was a joyful Ride that I would love to do all over again. Able to express my own Gaming Interests, Creativity and Genre interests through making my own Cutscene.
Using the Camera to make all the Scenes and choosing the perspective shots that I could use to make my Cutscene more impactful towards the Viewers. Learning how they make Cutscene and the Different shots has been very interesting and gave me development on my own skills to make Games with Stunning Cutscenes.
Reference List
devilleon7 (2017) Yakuza 0 – TRUE MAD DOG (NO DAMAGE) (HARD). www.youtube.com. Available online: https://www.youtube.com/watch?v=HjAkcYThY_I [Accessed 22 Jan. 2024].
GamersPrey (2023) Like a Dragon Gaiden The Man Who Erased His Name Yakuza Style Official Gameplay Trailer. www.youtube.com. Available online: https://www.youtube.com/watch?v=NVfKA3CzCtM [Accessed 22 Jan. 2024].
Buvesa Game Development (2022) Useful SHORTCUTS & Tips For UNREAL ENGINE 5 👉 That You Need To Know. www.youtube.com. Available online: https://www.youtube.com/watch?v=SGZMae0do2U [Accessed 22 Jan. 2024].
Hans (2021) Comunidad de Steam :: Guía :: Yakuza 6 Completionist Guide : 100% Achievements. steamcommunity.com. Available online: https://steamcommunity.com/sharedfiles/filedetails/?l=latam&id=2448102076 [Accessed 22 Jan. 2024].
Huang, A. (2020) Alex Huang – YouTube. www.youtube.com. Available online: https://www.youtube.com/@A1exHuang/featured [Accessed 22 Jan. 2024].
Huang, A. (2023) UE4 Niagara Lightning Around Effect – Tutorial. www.youtube.com. Available online: https://www.youtube.com/watch?v=hH1_DRcK4xM&t=433s [Accessed 22 Jan. 2024].
Mr Nick KE (2021) Unreal Engine – Cinematic Sequencer Shortcuts and How the Sequencer Works in UE4. www.youtube.com. Available online: https://www.youtube.com/watch?v=robCUHvrMGU [Accessed 22 Jan. 2024].
Prof, P. (2023) Switching Particle Systems On/Off with Sequencer in UE5. www.youtube.com. Available online: https://www.youtube.com/watch?v=Z6phql_llL4 [Accessed 22 Jan. 2024].
Ryu Ga Gotoku Studio and SEGA (2022) Yakuza Franchise. store.steampowered.com. Available online: https://store.steampowered.com/sale/franchise_yakuza [Accessed 22 Jan. 2024].
Santosx07 (2020) Yakuza Like a Dragon – Kazuma Kiryu First Appearance / Kiryu Returns. www.youtube.com. Available online: https://www.youtube.com/watch?v=qCkQWJo3aaA [Accessed 22 Jan. 2024].
Unreal Engine (2022) Managing the Texture Streaming Pool | Tips & Tricks | Unreal Engine – YouTube. www.youtube.com. Available online: https://www.youtube.com/watch?v=uk3W8Zhahdg [Accessed 16 May 2022].
West, K. (2023) Like a Dragon Gaiden – how to use extreme heat mode. Gfinity Esports. Available online: https://www.gfinityesports.com/guides/like-a-dragon-gaiden-extreme-heat-mode/ [Accessed 22 Jan. 2024].